Anime Eyes
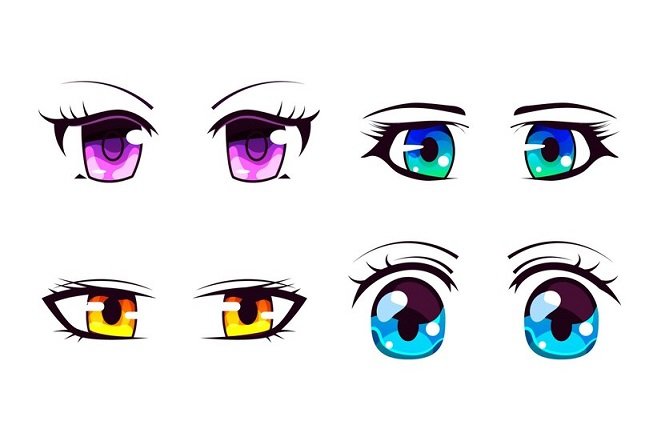
Anime eyes are one of the most distinctive and expressive features of the anime art style. They come in various shapes, sizes, and colors, reflecting a wide range of emotions and personalities. Learning how to draw anime eyes is a crucial step for any aspiring anime artist. This guide will take you through the process, step by step, and provide tips to help you master this essential skill.
Understanding the Basics
Before diving into the drawing process, it’s important to understand the basic anatomy of anime eyes. Anime eyes are often exaggerated and stylized, but they still follow certain principles of real eye anatomy.
- Shape: Anime eyes can be round, almond-shaped, or even more stylized. The shape often reflects the character’s age, gender, and personality.
- Pupils and Iris: The iris and pupil are usually larger in anime eyes compared to real eyes. This gives the eyes a more expressive and captivating look.
- Highlights: Highlights are crucial for giving the eyes a sense of depth and liveliness. They are usually placed on the upper part of the iris and can vary in size and number.
- Eyelashes and Eyebrows: Eyelashes and eyebrows help define the eye shape and convey emotions. They can be thick, thin, long, or short, depending on the character.
Step-by-Step Guide on How to Draw Anime Eyes
Step 1: Draw the Eye Shape
Start by drawing the basic shape of the eye. This can be a simple oval or a more complex shape depending on your character design. For beginners, it’s helpful to draw a horizontal line to guide the symmetry of the eyes.
- Outline: Sketch a light outline of the eye shape. This could be a basic oval or a more complex almond shape.
- Symmetry: Ensure that both eyes are symmetrical. You can use horizontal and vertical guidelines to help with this.
Step 2: Draw the Iris and Pupil
Next, draw the iris and pupil. The size and position of the iris can greatly affect the character’s expression.
- Iris: Draw a large circle for the iris. It should be about half the size of the eye shape.
- Pupil: Inside the iris, draw a smaller circle for the pupil. The pupil should be centered within the iris.
Step 3: Add Highlights
Highlights add life to the eyes. They should be placed where the light source hits the eye.
- Primary Highlight: Draw a large highlight near the top of the iris. This is where the main light source hits.
- Secondary Highlights: Add smaller highlights around the iris to give the eye more depth and sparkle.
Step 4: Draw the Eyelashes and Eyebrows
Eyelashes and eyebrows help define the character’s expression and personality.
- Upper Eyelashes: Draw thick, curved lines for the upper eyelashes. They should start from the outer corner of the eye and curve towards the inner corner.
- Lower Eyelashes: Draw thinner lines for the lower eyelashes. These can be less prominent than the upper lashes.
- Eyebrows: Draw the eyebrows above the eyes. The shape and thickness can vary based on the character’s gender and expression.
Step 5: Add Details and Refine
Now it’s time to add details and refine your drawing.
- Eyelids: Draw a curved line above the eye to represent the eyelid. This adds depth and realism to the eye.
- Shading: Add shading to the iris to give it more depth. You can use hatching or cross-hatching techniques for this.
- Refinement: Go over your lines to make them more defined. Erase any unnecessary guidelines.
Tips for Drawing Anime Eyes
- Practice Different Styles: Experiment with different shapes, sizes, and styles of anime eyes. This will help you find your unique style.
- Study Real Eyes: Understanding the anatomy of real eyes can help you draw more realistic and expressive anime eyes.
- Use References: Look at anime artwork for inspiration and reference. This can help you understand how different artists approach drawing anime eyes.
- Experiment with Colors: Anime eyes are often colorful and vibrant. Experiment with different color combinations to make your eyes stand out.
- Practice Consistently: Like any skill, drawing anime eyes takes practice. Set aside time each day to draw and improve your skills.
Common Mistakes to Avoid
- Overcomplicating: Keep your designs simple, especially when you’re just starting out. Overcomplicating can make the eyes look messy.
- Ignoring Symmetry: Symmetry is important for making your eyes look natural and balanced. Use guidelines to help maintain symmetry.
- Forgetting Highlights: Highlights are crucial for making the eyes look lively and realistic. Don’t forget to add them.
- Inconsistent Styles: Stick to a consistent style for both eyes. Inconsistencies can make your drawing look unbalanced.
- Neglecting Practice: Regular practice is essential for improvement. Don’t get discouraged if your first few attempts aren’t perfect.
Advanced Techniques
Once you’re comfortable with the basics, you can start exploring more advanced techniques.
- Dynamic Angles: Practice drawing eyes from different angles and perspectives. This will make your characters look more dynamic and realistic.
- Expressive Variations: Experiment with different shapes and styles to convey various emotions. For example, wider eyes can indicate surprise or innocence, while narrower eyes can suggest anger or determination.
- Complex Shading: Use advanced shading techniques to add more depth and realism to your eyes. This can include blending colors, adding gradients, and creating more detailed highlights and shadows.
Conclusion
Learning how to draw anime eyes is a rewarding and essential skill for any anime artist. By understanding the basics, practicing regularly, and experimenting with different styles and techniques, you can create expressive and captivating eyes that bring your characters to life. Remember to keep practicing, stay inspired, and most importantly, have fun with your drawing journey. Happy drawing!


